Contribute Developer Documentation to Gutenberg
Another post in my series on contributing to the WordPress Gutenberg project. This post complements my Good First Issue post that focused more on a coding contribution. Here I take a step back and focus on documentation and dive deeper into the GitHub pull request process.
Video screencast of the process
Find an Issue
Browse the Documentation label on GitHub to find issues filed that require documentation. Also, free free to create your own ticket and write for areas that you see have necessary gaps.
Feel free to discuss on the #docs channel in Slack (free signup) if you have any questions.
Writing Content
The Gutenberg documentation is stored as markdown in the docs/ directory in the repository. Review the Contributing Guide for information on formatting, how to create links, and adding code examples.
You can also review the main WordPress Documentation Handbook for grammar, tone, and voice guidance.
Contribution Process
The Gutenberg project uses GitHub to manage the source code, issues, and contributions. You will need a GitHub account to contribute.
The pull request process is basically you make a copy of the repository, make the change to your copy, and then submit that change as a PR to the main repository to merge.
This post walks through two different ways to manage this PR process, as well as a third process when creating a new document.
- Contribute directly on GitHub.
- Fork and edit locally.
- Add a new file.
1. Contribute directly on GitHub
This is by far the easiest way to contribute, it requires no local copies, and GitHub does most of the work of forking and creating a pull request (PR).
Step 1: Find the document you want to edit.
As you browse the Block Editor handbook, there is an “Edit” link next to the title on each page. This link takes you straight to the source to submit your contribution.
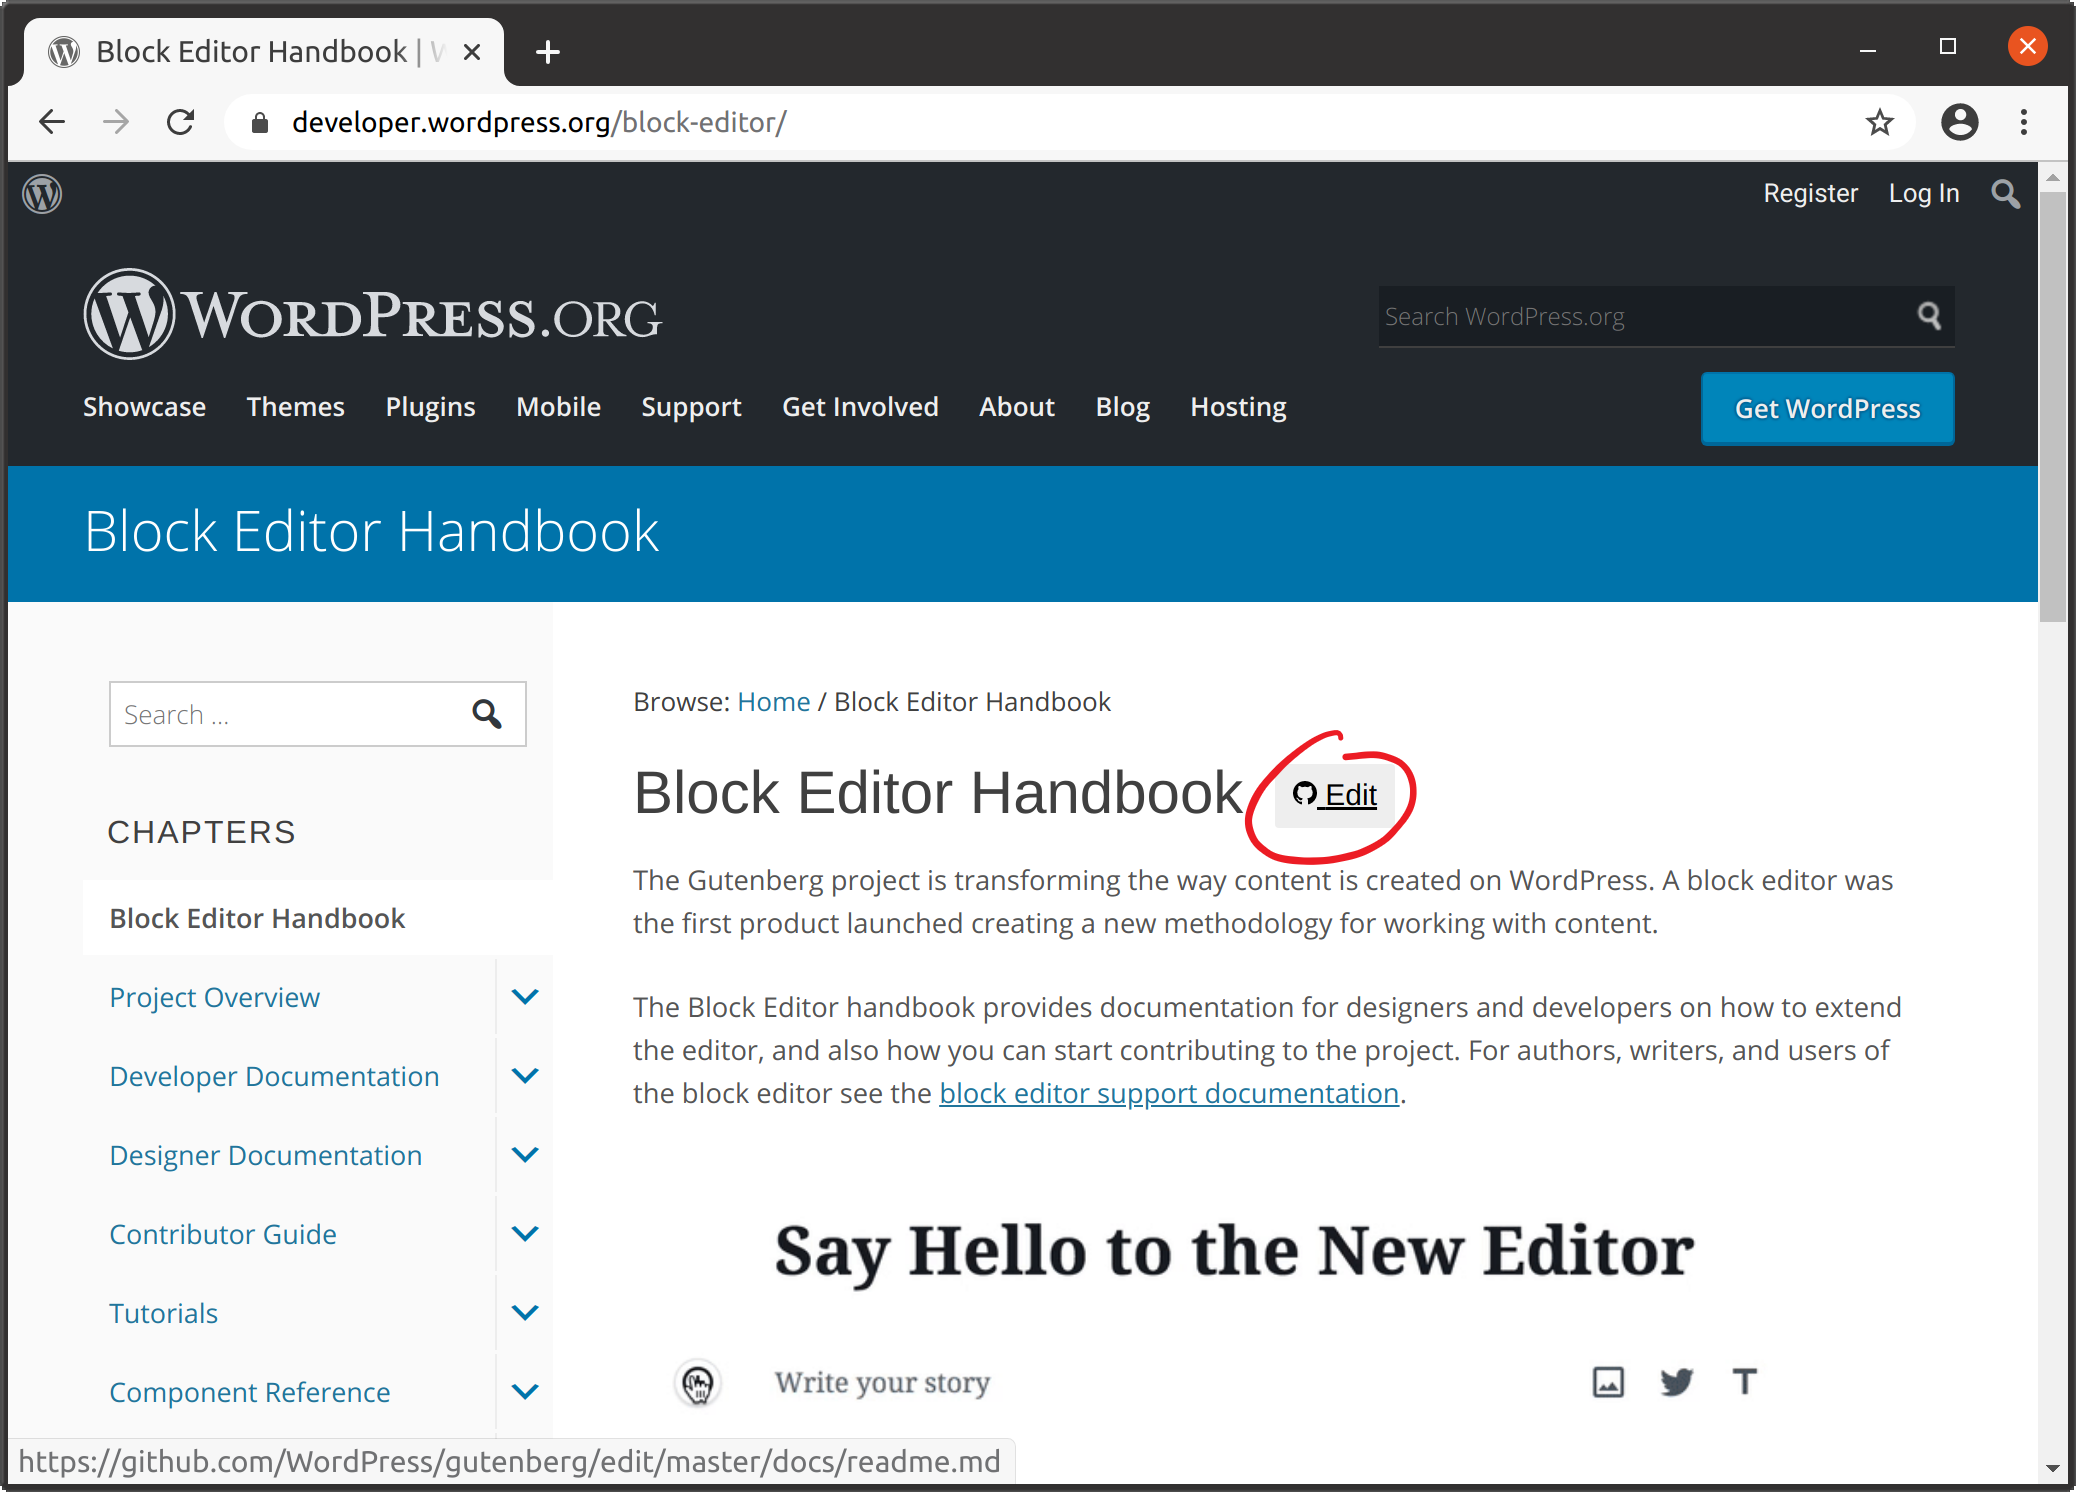
Edit File from Block Editor Handbook
Alternatively, you can find the document you want to edit by browsing the GitHub repository to the markdown file you want to edit and click the pencil icon.
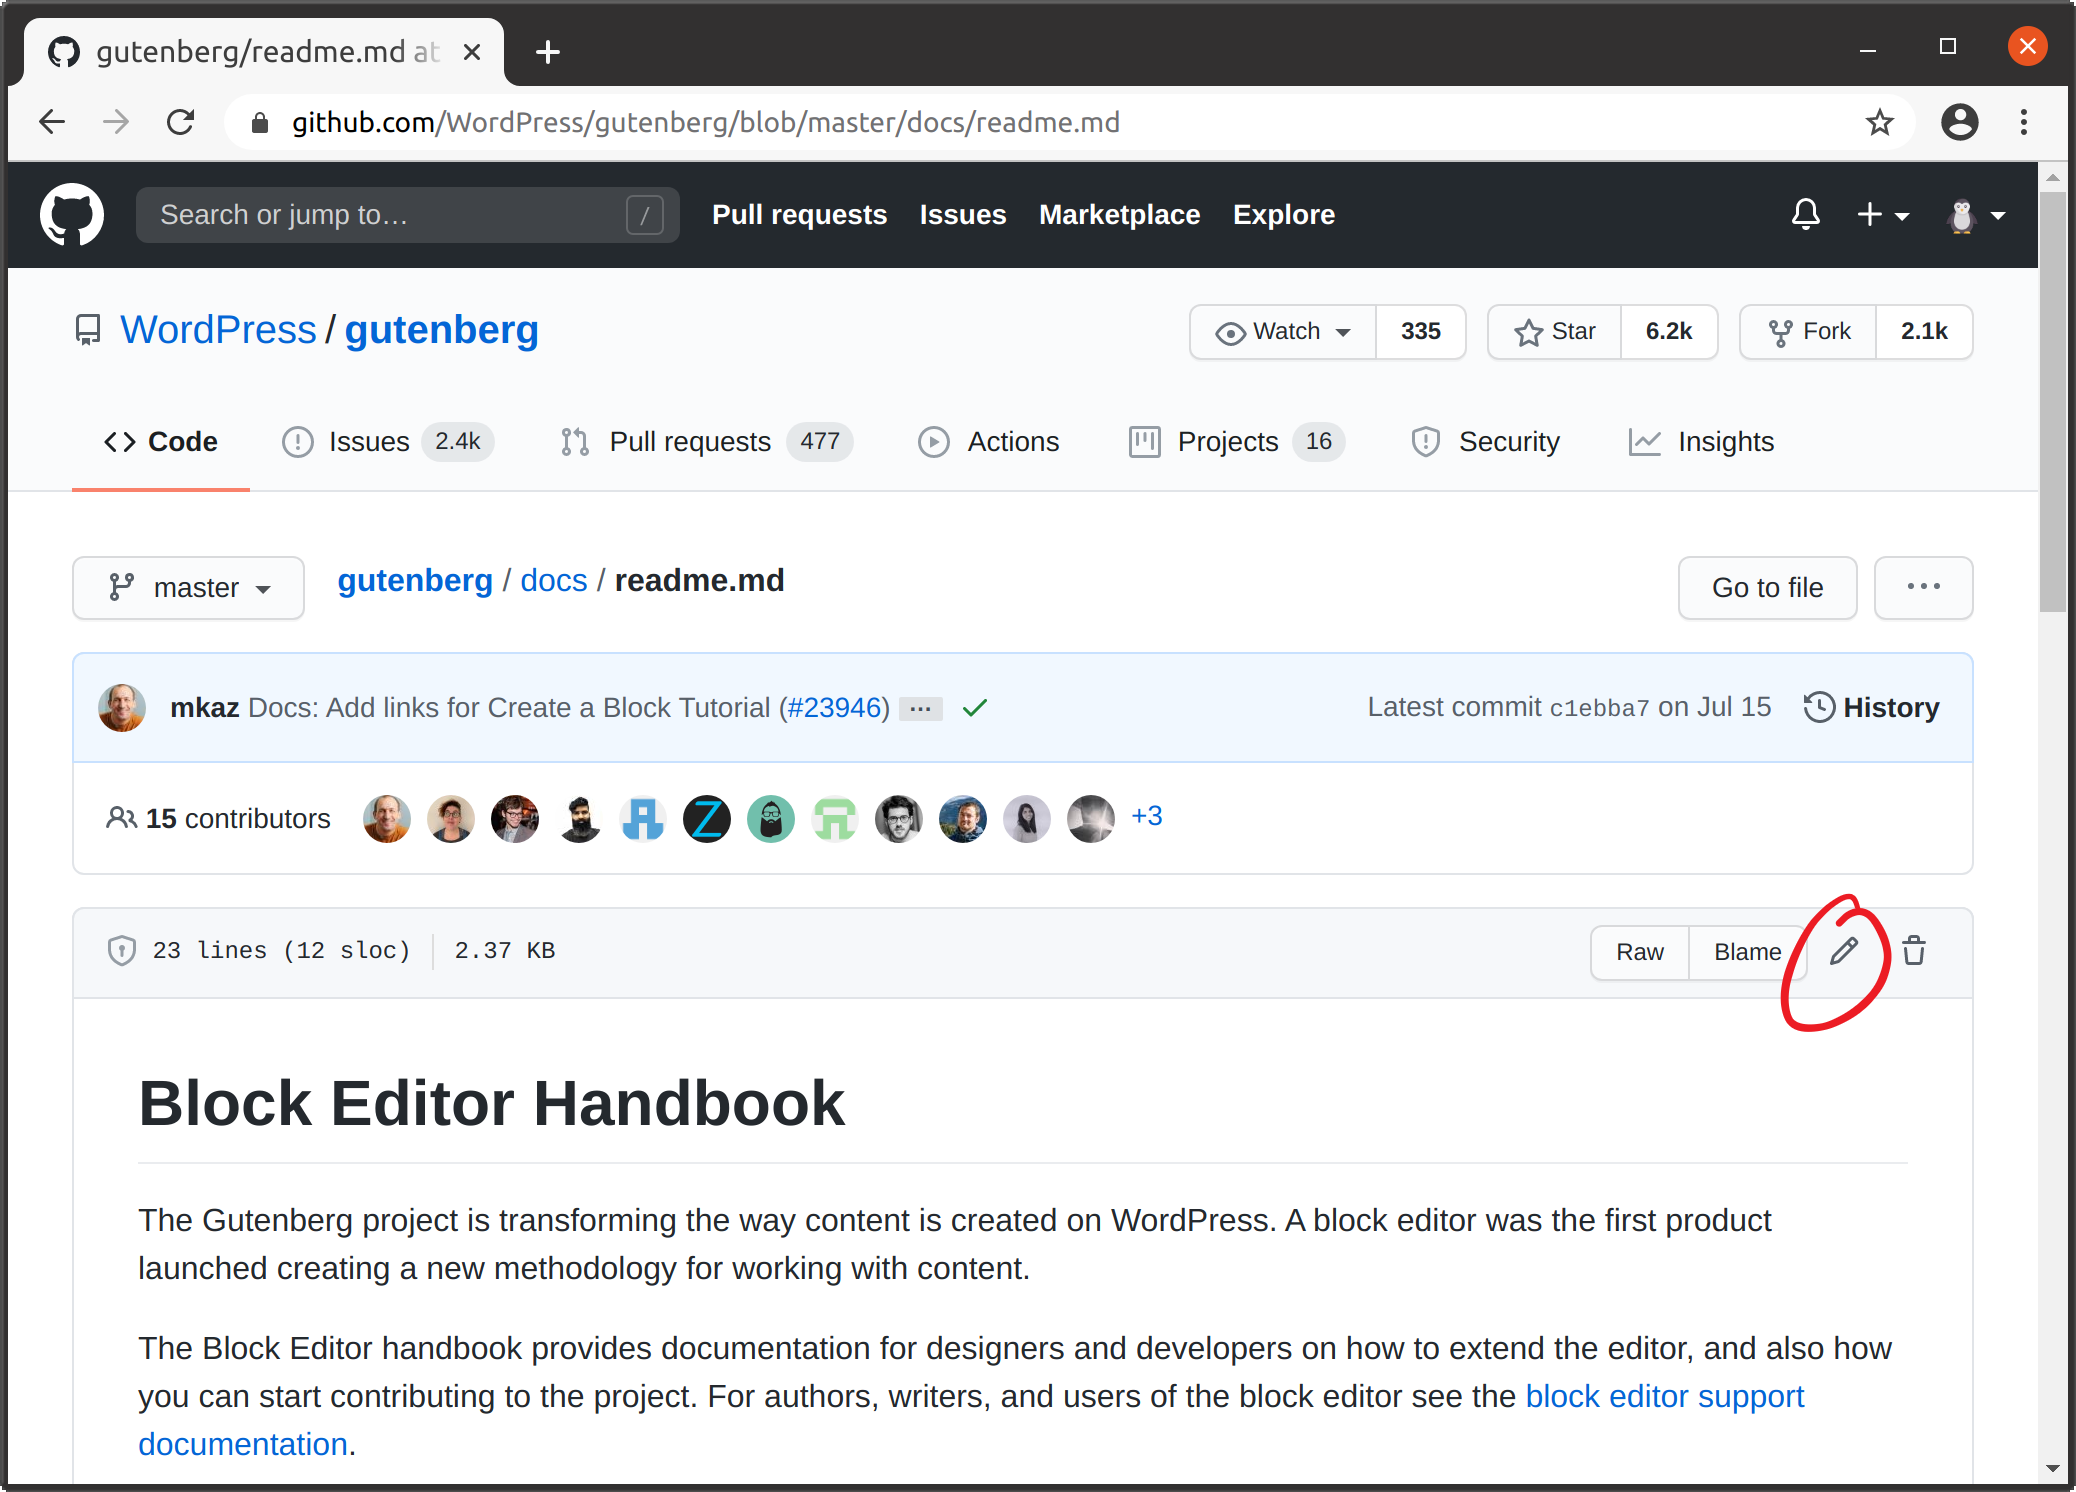
Edit File from GitHub repo
Step 2: Clicking edit opens an editor in GitHub that allows you to make the change directly. Make the change you want and add a relevant title and description.
Step 3: Click** Propose Change** button to submit. GitHub will automatically fork the repository to your account, and display a “Comparing changes” screen to highlight your changes with the main repository. From this screen, click Create pull request to start a PR.
Step 4: The “Open a pull request” form should be filled out with the details of your change. The Gutenberg repository includes a template for the form of items you can include, such as Description, How to test, and Screenshots. Please add anything to help a reviewer with context and making it easier on them to approve. Click the Create pull request button and it will create your PR and submit it for review. You can find your PR on the pull requests page: https://github.com/WordPress/gutenberg/pulls
Step 5: Stay on top of the PR, look for any comments or requests for changes. If you need to make an update, go to the “Files changed” page for your PR and edit the file. This will keep your edits together in a single PR.
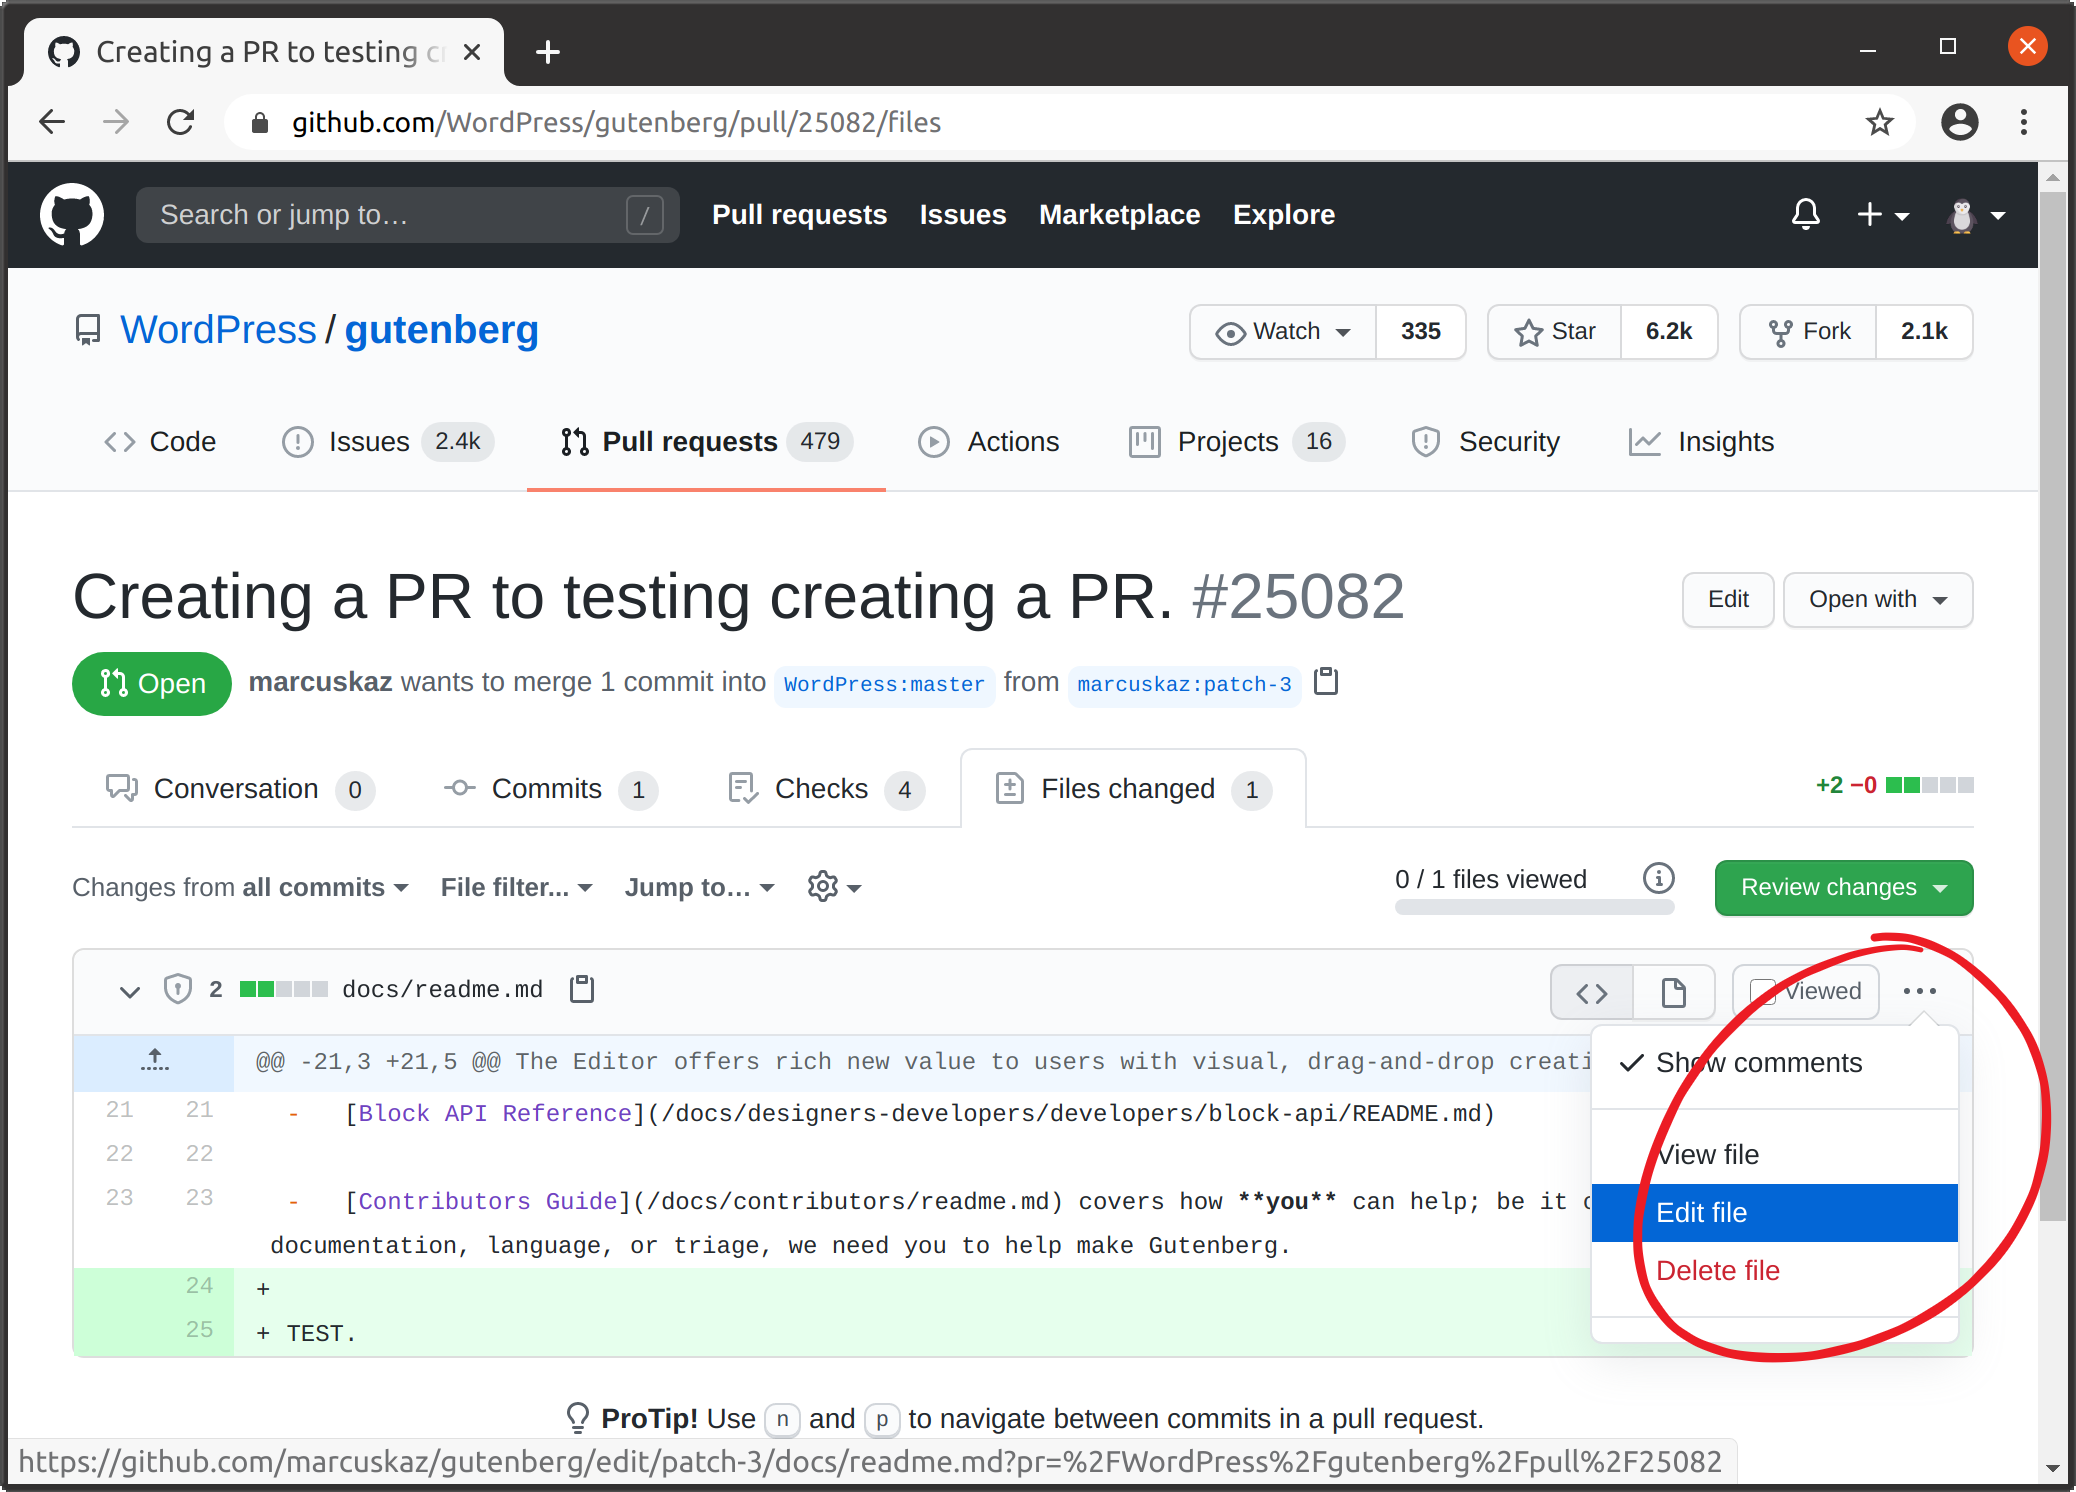
Edit File in an existing PR
Once your PR is approved, it will be merged and you’re a new contributor 🎉
2. Fork and Edit Local
The second method of submitting a PR is similar to the above, but all the management is done on your local machine. This requires git and a text editor to be installed if not already.
I find the command-line the most straight-forward, but there are GUI clients also available. The process is the same, the command names my differ slightly. Install git using your package manager, or see the git site for downloads.
Step 1: Go to the Gutenberg repository on GitHub and click Fork, this will create a copy to your account; for my username marcuskaz the copy is created at:
https://github.com/marcuskaz/gutenberg

GitHub Fork
Step 2: Clone your forked repository locally. This copies all the files to your computer. Open a terminal and run:
git clone https://github.com/marcuskaz/gutenberg
This will create a directory called gutenberg with all the files for the project. It might take a couple of minutes, it is downloading the entire history of the Gutenberg project.
Step 3: Navigate to the document you want to change, and make your update using your text editor.
Step 4: Commit your change. This will commit your change to your local copy of the repository.
git commit -m "Your Commit Message" docs/path/to/FILE
Step 5: Push your change up to GitHub, this will still be made to your copy of the repository, just on the GitHub remote server.
git push -u origin master
Step 6: Go to your repository on GitHub, it will detect the change and give you a link to create a pull request.
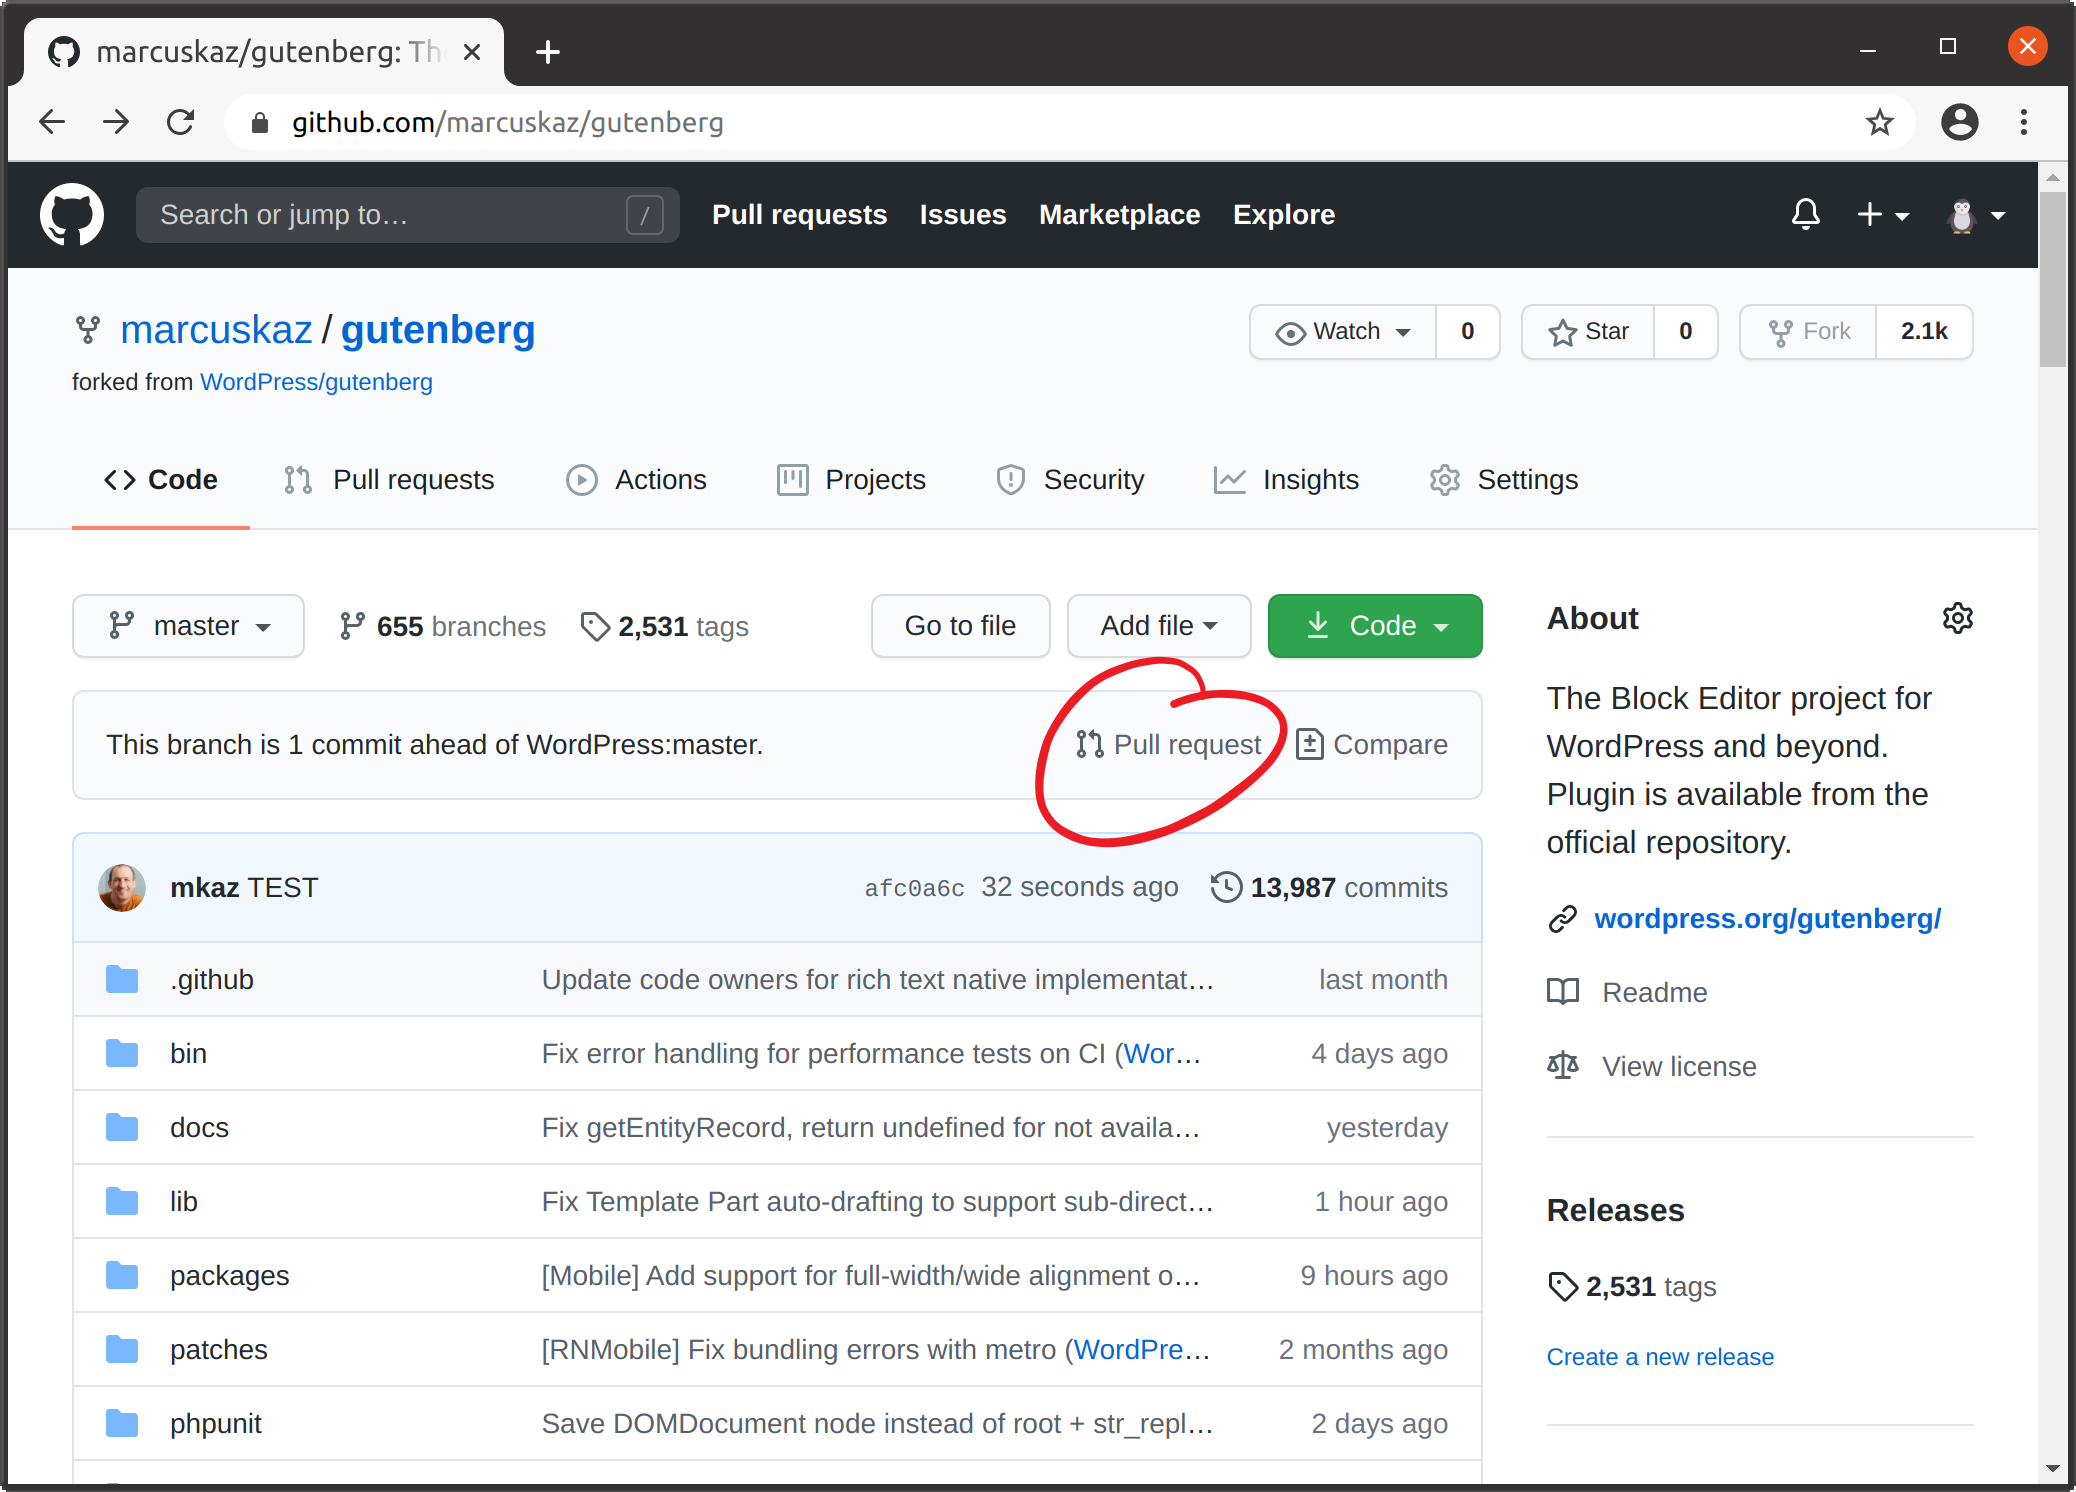
Pull request prompt
Step 7: Create the pull request, this will create the request on the WordPress Gutenberg repository to integrate the change from your repository.
Step 8: Keep up on the pull request, if any additional changes or updates are requested than make the changes locally and push them up, following Steps 3-5.
You should not make a new pull request when you make changes; by pushing your change up it will update the PR. The PR is really just a pointer on the WordPress Gutenberg repository to your copy. So when you update your copy, the PR is also updated.
That’s it, once approved and merged your copy will be incorporated into the main repository. 🎉
3. Add a New File
If you want to add a new document, there are a couple additional steps required due to how the Block Editor Handbook is published. There is a process that runs every 15 minutes that checks for changes and copies them to the handbook site.
The publishing process uses a table of contents file docs/toc.json to generate a manifest file that is used by WordPress for publishing.
When adding a new file, you need to edit the toc.json file to add your file, and then run npm run docs:build to generate the new manifest file. This requires having Node installed. See the development environment setup tutorial for complete instructions.
So adding a new file is the same process as above, just requires a couple of additional steps in Step 3.
3a. Make your change, adding new file
3b. Edit docs/toc.json adding your file in the hierarchy
3c. Generate manifest: npm run docs:build 4. Commit all updated files
git commit -a -m "Commit Message"
At this point, it is the same process above Step 5 and after. Push your change up, and create the pull request.
Keep Local Repository Up to Date
You will want to keep your forked repository up to date, in case the same file is edited by someone else. Starting from the latest updates will avoid conflicts.
For this you want pull in all the changes from the main WordPress repository to your fork. The following command will add a remote called “upstream” that refers to the main WordPress repository
git remote add upstream https://github.com/WordPress/gutenbeg
You next need to pull the changes from the remote to update your local copy:
git pull upstream master
Finally, you will want to push up these changes back to your copy of the forked repository:
git push origin master